关于LLVM,这些东西你必须知道!

只要你和代码打交道,了解编译器的工作流程和原理定会让你受益无穷,无论是分析程序,还是基于它写自己的插件,甚至学习一门全新的语音。通过本文,将带你了解LLVM,并使用LLVM来完成一些有意思的事情。

一、什么是LLVM?

The LLVM Project is a collection of modular and reusable compiler and toolchain technologies.

简单来说,LLVM项目是一系列分模块、可重用的编译工具链。它提供了一种代码编写良好的中间表示(IR),可以作为多种语言的后端,还可以提供与变成语言无关的优化和针对多种cpu的代码生成功能。

先来看下LLVM架构的主要组成部分:

  • 前端:前端用来获取源代码然后将它转变为某种中间表示,我们可以选择不同的编译器来作为LLVM的前端,如gcc,clang。
  • Pass(通常翻译为“流程”):Pass用来将程序的中间表示之间相互变换。一般情况下,Pass可以用来优化代码,这部分通常是我们关注的部分。
  • 后端:后端用来生成实际的机器码。

虽然如今大多数编译器都采用的是这种架构,但是LLVM不同的就是对于不同的语言它都提供了同一种中间表示。传统的编译器的架构如下:

LLVM的架构如下:

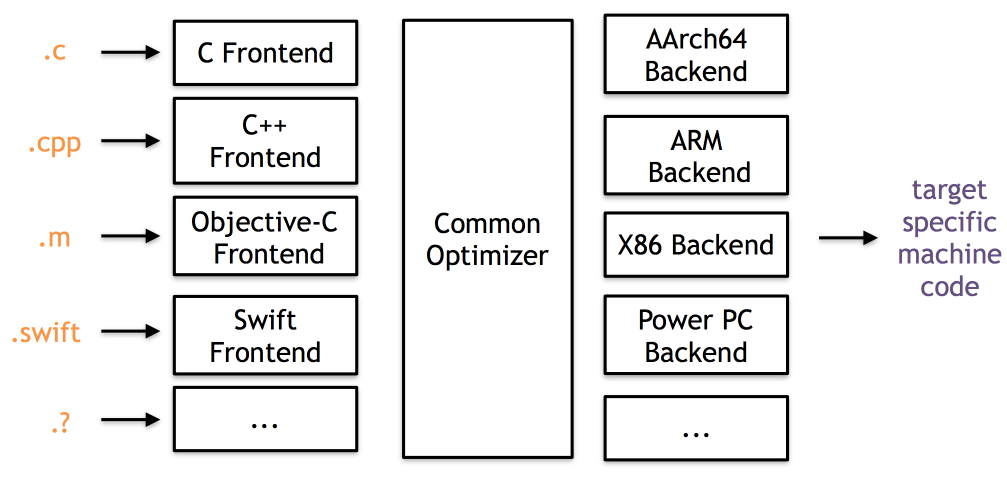
当编译器需要支持多种源代码和目标架构时,基于LLVM的架构,设计一门新的语言只需要去实现一个新的前端就行了,支持新的后端架构也只需要实现一个新的后端就行了。其它部分完成可以复用,就不用再重新设计一次了。

二、安装编译LLVM

这里使用clang作为前端:

1.直接从官网下载:http://releases.llvm.org/download.html

2.svn获取

1
2
3
4
5
6
7
svn co http://llvm.org/svn/llvm-project/llvm/trunk llvm
cd llvm/tools
svn co http://llvm.org/svn/llvm-project/cfe/trunk clang
cd ../projects
svn co http://llvm.org/svn/llvm-project/compiler-rt/trunk compiler-rt
cd ../tools/clang/tools
svn co http://llvm.org/svn/llvm-project/clang-tools-extra/trunk extra

3.git获取

1
2
3
4
5
6
7
git clone http://llvm.org/git/llvm.git
cd llvm/tools
git clone http://llvm.org/git/clang.git
cd ../projects
git clone http://llvm.org/git/compiler-rt.git
cd ../tools/clang/tools
git clone http://llvm.org/git/clang-tools-extra.git

最新的LLVM只支持cmake来编译了,首先安装cmake。

1
brew install cmake

编译:

1
2
3
mkdir build
cmake /path/to/llvm/source
cmake --build .

编译时间比较长,而且编译结果会生成20G左右的文件。

编译完成后,就能在build/bin/目录下面找到生成的工具了。

三、从源码到可执行文件

我们在开发的时候的时候,如果想要生成一个可执行文件或应用,我们点击run就完事了,那么在点击run之后编译器背后又做了哪些事情呢?

我们先来一个例子:

1
2
3
4
5
6
7
8
9
10
11
12
13
14
#import <Foundation/Foundation.h>

#define TEN 10

int main(){
@autoreleasepool {
int numberOne = TEN;
int numberTwo = 8;
NSString* name = [[NSString alloc] initWithUTF8String:"AloneMonkey"];
int age = numberOne + numberTwo;
NSLog(@"Hello, %@, Age: %d", name, age);
}
return 0;
}

上面这个文件,我们可以通过命令行直接编译,然后链接:

1
2
xcrun -sdk iphoneos clang -arch armv7 -F Foundation -fobjc-arc -c main.m -o main.o
xcrun -sdk iphoneos clang main.o -arch armv7 -fobjc-arc -framework Foundation -o main

拷贝到手机运行:

1
2
monkeyde-iPhone:/tmp root# ./main
2016-12-19 17:16:34.654 main[2164:213100] Hello, AloneMonkey, Age: 18

大家不会以为就这样就完了吧,当然不是,我们要继续深入剖析。

3.1 预处理(Preprocess)

这部分包括macro宏的展开,import/include头文件的导入,以及#if等处理。

可以通过执行以下命令,来告诉clang只执行到预处理这一步:

1
clang -E main.m

执行完这个命令之后,我们会发现导入了很多的头文件内容。

1
2
3
4
5
6
7
8
9
10
11
12
13
14
15
......
# 1 "/System/Library/Frameworks/Foundation.framework/Headers/FoundationLegacySwiftCompatibility.h" 1 3
# 185 "/System/Library/Frameworks/Foundation.framework/Headers/Foundation.h" 2 3
# 2 "main.m" 2

int main(){
@autoreleasepool {
int numberOne = 10;
int numberTwo = 8;
NSString* name = [[NSString alloc] initWithUTF8String:"AloneMonkey"];
int age = numberOne + numberTwo;
NSLog(@"Hello, %@, Age: %d", name, age);
}
return 0;
}

可以看到上面的预处理已经把宏替换了,并且导入了头文件。但是这样的话会引入很多不会去改变的系统库比如Foundation,所以有了pch预处理文件,可以在这里去引入一些通用的头文件。

后来Xcode新建的项目里面去掉了pch文件,引入了moduels的概念,把一些通用的库打成modules的形式,然后导入,默认会加上-fmodules参数。

1
clang -E -fmodules main.m

这样的话,只需要@import一下就能导入对应库的modules模块了。

1
2
3
4
5
6
7
8
9
10
11
@import Foundation; 
int main(){
@autoreleasepool {
int numberOne = 10;
int numberTwo = 8;
NSString* name = [[NSString alloc] initWithUTF8String:"AloneMonkey"];
int age = numberOne + numberTwo;
NSLog(@"Hello, %@, Age: %d", name, age);
}
return 0;
}

3.2 词法分析 (Lexical Analysis)

在预处理之后,就要进行词法分析了,将预处理过的代码转化成一个个Token,比如左括号、右括号、等于、字符串等等。

1
clang -fmodules -fsyntax-only -Xclang -dump-tokens main.m
1
2
3
4
5
6
7
8
9
10
11
12
13
14
15
16
17
18
19
20
21
22
23
24
25
26
27
28
29
30
31
32
33
34
35
36
37
38
39
40
41
42
43
44
45
46
47
48
49
50
51
52
53
54
55
56
annot_module_include '#import <F'		Loc=<main.m:1:1>
int 'int' [StartOfLine] Loc=<main.m:5:1>
identifier 'main' [LeadingSpace] Loc=<main.m:5:5>
l_paren '(' Loc=<main.m:5:9>
r_paren ')' Loc=<main.m:5:10>
l_brace '{' Loc=<main.m:5:11>
at '@' [StartOfLine] [LeadingSpace] Loc=<main.m:6:5>
identifier 'autoreleasepool' Loc=<main.m:6:6>
l_brace '{' [LeadingSpace] Loc=<main.m:6:22>
int 'int' [StartOfLine] [LeadingSpace] Loc=<main.m:7:9>
identifier 'numberOne' [LeadingSpace] Loc=<main.m:7:13>
equal '=' [LeadingSpace] Loc=<main.m:7:23>
numeric_constant '10' [LeadingSpace] Loc=<main.m:7:25 <Spelling=main.m:3:13>>
semi ';' Loc=<main.m:7:28>
int 'int' [StartOfLine] [LeadingSpace] Loc=<main.m:8:9>
identifier 'numberTwo' [LeadingSpace] Loc=<main.m:8:13>
equal '=' [LeadingSpace] Loc=<main.m:8:23>
numeric_constant '8' [LeadingSpace] Loc=<main.m:8:25>
semi ';' Loc=<main.m:8:26>
identifier 'NSString' [StartOfLine] [LeadingSpace] Loc=<main.m:9:9>
star '*' Loc=<main.m:9:17>
identifier 'name' [LeadingSpace] Loc=<main.m:9:19>
equal '=' [LeadingSpace] Loc=<main.m:9:24>
l_square '[' [LeadingSpace] Loc=<main.m:9:26>
l_square '[' Loc=<main.m:9:27>
identifier 'NSString' Loc=<main.m:9:28>
identifier 'alloc' [LeadingSpace] Loc=<main.m:9:37>
r_square ']' Loc=<main.m:9:42>
identifier 'initWithUTF8String' [LeadingSpace] Loc=<main.m:9:44>
colon ':' Loc=<main.m:9:62>
string_literal '"AloneMonkey"' Loc=<main.m:9:63>
r_square ']' Loc=<main.m:9:76>
semi ';' Loc=<main.m:9:77>
int 'int' [StartOfLine] [LeadingSpace] Loc=<main.m:10:9>
identifier 'age' [LeadingSpace] Loc=<main.m:10:13>
equal '=' [LeadingSpace] Loc=<main.m:10:17>
identifier 'numberOne' [LeadingSpace] Loc=<main.m:10:19>
plus '+' [LeadingSpace] Loc=<main.m:10:29>
identifier 'numberTwo' [LeadingSpace] Loc=<main.m:10:31>
semi ';' Loc=<main.m:10:40>
identifier 'NSLog' [StartOfLine] [LeadingSpace] Loc=<main.m:11:9>
l_paren '(' Loc=<main.m:11:14>
at '@' Loc=<main.m:11:15>
string_literal '"Hello, %@, Age: %d"' Loc=<main.m:11:16>
comma ',' Loc=<main.m:11:36>
identifier 'name' [LeadingSpace] Loc=<main.m:11:38>
comma ',' Loc=<main.m:11:42>
identifier 'age' [LeadingSpace] Loc=<main.m:11:44>
r_paren ')' Loc=<main.m:11:47>
semi ';' Loc=<main.m:11:48>
r_brace '}' [StartOfLine] [LeadingSpace] Loc=<main.m:12:5>
return 'return' [StartOfLine] [LeadingSpace] Loc=<main.m:13:5>
numeric_constant '0' [LeadingSpace] Loc=<main.m:13:12>
semi ';' Loc=<main.m:13:13>
r_brace '}' [StartOfLine] Loc=<main.m:14:1>
eof '' Loc=<main.m:14:2>

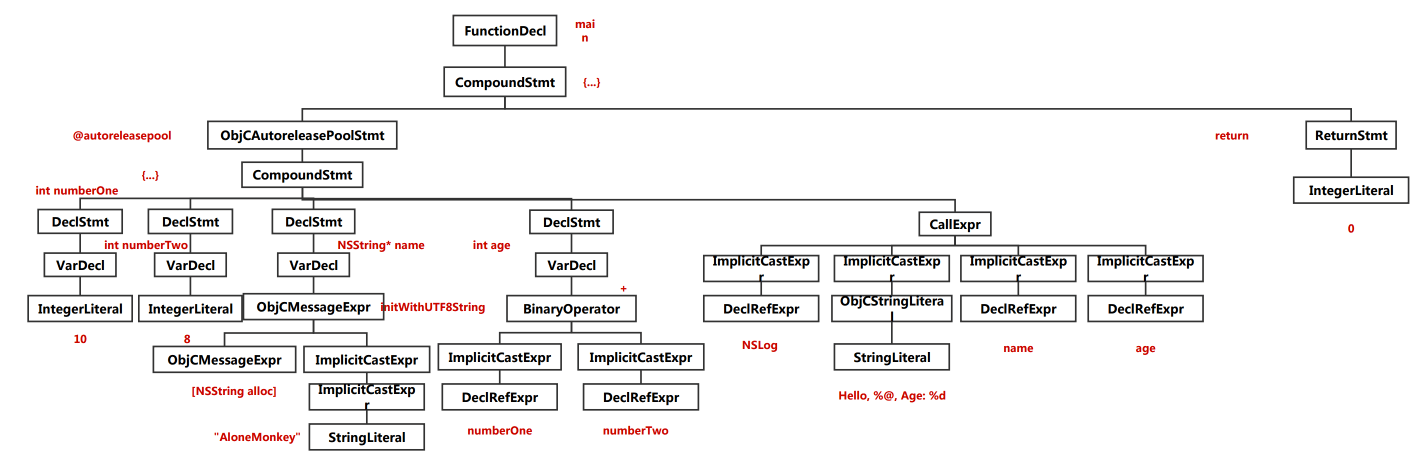
3.3 语法分析 (Semantic Analysis)

根据当前语言的语法,验证语法是否正确,并将所有节点组合成抽象语法树(AST)

1
clang -fmodules -fsyntax-only -Xclang -ast-dump main.m
1
2
3
4
5
6
7
8
9
10
11
12
13
14
15
16
17
18
19
20
21
22
23
24
25
26
27
28
29
30
31
32
33
34
35
36
37
......
`-FunctionDecl 0x7f8661d8a370 <main.m:5:1, line:14:1> line:5:5 main 'int ()'
`-CompoundStmt 0x7f8661d8aab0 <col:11, line:14:1>
|-ObjCAutoreleasePoolStmt 0x7f8661d8aa68 <line:6:5, line:12:5>
| `-CompoundStmt 0x7f8661d8aa28 <line:6:22, line:12:5>
| |-DeclStmt 0x7f8661d8a4a0 <line:7:9, col:28>
| | `-VarDecl 0x7f8661d8a420 <col:9, line:3:13> line:7:13 used numberOne 'int' cinit
| | `-IntegerLiteral 0x7f8661d8a480 <line:3:13> 'int' 10
| |-DeclStmt 0x7f8661d8a550 <line:8:9, col:26>
| | `-VarDecl 0x7f8661d8a4d0 <col:9, col:25> col:13 used numberTwo 'int' cinit
| | `-IntegerLiteral 0x7f8661d8a530 <col:25> 'int' 8
| |-DeclStmt 0x7f8661d8a6c0 <line:9:9, col:77>
| | `-VarDecl 0x7f8661d8a580 <col:9, col:76> col:19 used name 'NSString *' cinit
| | `-ObjCMessageExpr 0x7f8661d8a688 <col:26, col:76> 'NSString * _Nullable':'NSString *' selector=initWithUTF8String:
| | |-ObjCMessageExpr 0x7f8661d8a5f0 <col:27, col:42> 'NSString *' selector=alloc class='NSString'
| | `-ImplicitCastExpr 0x7f8661d8a670 <col:63> 'const char * _Nonnull':'const char *' <BitCast>
| | `-ImplicitCastExpr 0x7f8661d8a658 <col:63> 'char *' <ArrayToPointerDecay>
| | `-StringLiteral 0x7f8661d8a620 <col:63> 'char [12]' lvalue "AloneMonkey"
| |-DeclStmt 0x7f8661d8a7f8 <line:10:9, col:40>
| | `-VarDecl 0x7f8661d8a6f0 <col:9, col:31> col:13 used age 'int' cinit
| | `-BinaryOperator 0x7f8661d8a7d0 <col:19, col:31> 'int' '+'
| | |-ImplicitCastExpr 0x7f8661d8a7a0 <col:19> 'int' <LValueToRValue>
| | | `-DeclRefExpr 0x7f8661d8a750 <col:19> 'int' lvalue Var 0x7f8661d8a420 'numberOne' 'int'
| | `-ImplicitCastExpr 0x7f8661d8a7b8 <col:31> 'int' <LValueToRValue>
| | `-DeclRefExpr 0x7f8661d8a778 <col:31> 'int' lvalue Var 0x7f8661d8a4d0 'numberTwo' 'int'
| `-CallExpr 0x7f8661d8a9a0 <line:11:9, col:47> 'void'
| |-ImplicitCastExpr 0x7f8661d8a988 <col:9> 'void (*)(id, ...)' <FunctionToPointerDecay>
| | `-DeclRefExpr 0x7f8661d8a810 <col:9> 'void (id, ...)' Function 0x7f86618df0e0 'NSLog' 'void (id, ...)'
| |-ImplicitCastExpr 0x7f8661d8a9e0 <col:15, col:16> 'id':'id' <BitCast>
| | `-ObjCStringLiteral 0x7f8661d8a8b8 <col:15, col:16> 'NSString *'
| | `-StringLiteral 0x7f8661d8a878 <col:16> 'char [19]' lvalue "Hello, %@, Age: %d"
| |-ImplicitCastExpr 0x7f8661d8a9f8 <col:38> 'NSString *' <LValueToRValue>
| | `-DeclRefExpr 0x7f8661d8a8d8 <col:38> 'NSString *' lvalue Var 0x7f8661d8a580 'name' 'NSString *'
| `-ImplicitCastExpr 0x7f8661d8aa10 <col:44> 'int' <LValueToRValue>
| `-DeclRefExpr 0x7f8661d8a900 <col:44> 'int' lvalue Var 0x7f8661d8a6f0 'age' 'int'
`-ReturnStmt 0x7f8661d8aa98 <line:13:5, col:12>
`-IntegerLiteral 0x7f8661d8aa78 <col:12> 'int' 0

语法树直观图:

image

3.4 IR代码生成 (CodeGen)

CodeGen负责将语法树从顶至下遍历,翻译成LLVM IR,LLVM IR是Frontend的输出,也是LLVM Backerend的输入,桥接前后端。

可以在中间代码层次去做一些优化工作,我们在Xcode的编译设置里面也可以设置优化级别-O1,-O3,-Os。 还可以去写一些自己的Pass,这里需要解释一下什么是Pass。

Pass就是LLVM系统转化和优化的工作的一个节点,每个节点做一些工作,这些工作加起来就构成了LLVM整个系统的优化和转化。

1
clang -S -fobjc-arc -emit-llvm main.m -o main.ll
1
2
3
4
5
6
7
8
9
10
11
12
13
14
15
16
17
18
19
20
21
22
23
24
25
26
27
28
29
30
31
32
33
34
35
36
37
38
39
40
41
42
43
44
45
46
47
48
49
50
51
52
......
; Function Attrs: ssp uwtable
define i32 @main() #0 {
entry:
%retval = alloca i32, align 4
%numberOne = alloca i32, align 4
%numberTwo = alloca i32, align 4
%name = alloca %0*, align 8
%age = alloca i32, align 4
store i32 0, i32* %retval, align 4
%0 = call i8* @objc_autoreleasePoolPush() #3
store i32 10, i32* %numberOne, align 4
store i32 8, i32* %numberTwo, align 4
%1 = load %struct._class_t*, %struct._class_t** @"OBJC_CLASSLIST_REFERENCES_$_", align 8
%2 = load i8*, i8** @OBJC_SELECTOR_REFERENCES_, align 8, !invariant.load !7
%3 = bitcast %struct._class_t* %1 to i8*
%call = call i8* bitcast (i8* (i8*, i8*, ...)* @objc_msgSend to i8* (i8*, i8*)*)(i8* %3, i8* %2)
%4 = bitcast i8* %call to %0*
%5 = load i8*, i8** @OBJC_SELECTOR_REFERENCES_.2, align 8, !invariant.load !7
%6 = bitcast %0* %4 to i8*
%call1 = call i8* bitcast (i8* (i8*, i8*, ...)* @objc_msgSend to i8* (i8*, i8*, i8*)*)(i8* %6, i8* %5, i8* getelementptr inbounds ([12 x i8], [12 x i8]* @.str, i32 0, i32 0))
%7 = bitcast i8* %call1 to %0*
store %0* %7, %0** %name, align 8
%8 = load i32, i32* %numberOne, align 4
%9 = load i32, i32* %numberTwo, align 4
%10 = sub i32 0, %9
%11 = sub nsw i32 %8, %10
%add = add nsw i32 %8, %9
store i32 %11, i32* %age, align 4
%12 = load %0*, %0** %name, align 8
%13 = load i32, i32* %age, align 4
notail call void (i8*, ...) @NSLog(i8* bitcast (%struct.__NSConstantString_tag* @_unnamed_cfstring_ to i8*), %0* %12, i32 %13)
%14 = bitcast %0** %name to i8**
call void @objc_storeStrong(i8** %14, i8* null) #3
call void @objc_autoreleasePoolPop(i8* %0)
ret i32 0
}

declare i8* @objc_autoreleasePoolPush()

; Function Attrs: nonlazybind
declare i8* @objc_msgSend(i8*, i8*, ...) #1

declare void @NSLog(i8*, ...) #2

declare void @objc_storeStrong(i8**, i8*)

declare void @objc_autoreleasePoolPop(i8*)

......
!6 = !{!"clang version 4.0.0 (trunk 289913) (llvm/trunk 289911)"}
!7 = !{}

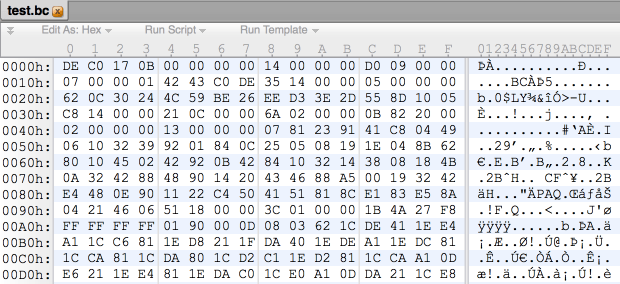
3.5 生成字节码 (LLVM Bitcode)

我们在Xcode7中默认生成bitcode就是这种的中间形式存在, 开启了bitcode,那么苹果后台拿到的就是这种中间代码,苹果可以对bitcode做一个进一步的优化,如果有新的后端架构,仍然可以用这份bitcode去生成。

1
clang -emit-llvm -c main.m -o main.bc

image

3.6 生成相关汇编

1
clang -S -fobjc-arc main.m -o main.s
1
2
3
4
5
6
7
8
9
10
11
12
13
14
15
16
17
18
19
20
21
22
23
24
25
26
27
28
29
30
31
32
33
34
35
36
37
38
39
40
41
42
43
44
45
46
47
48
49
50
51
52
53
54
55
56
57
58
59
60
61
62
63
64
65
66
67
68
69
70
71
72
73
74
75
76
77
78
79
80
81
82
83
84
85
86
87
88
89
90
91
92
93
94
95
96
97
98
99
100
101
102
	.section	__TEXT,__text,regular,pure_instructions
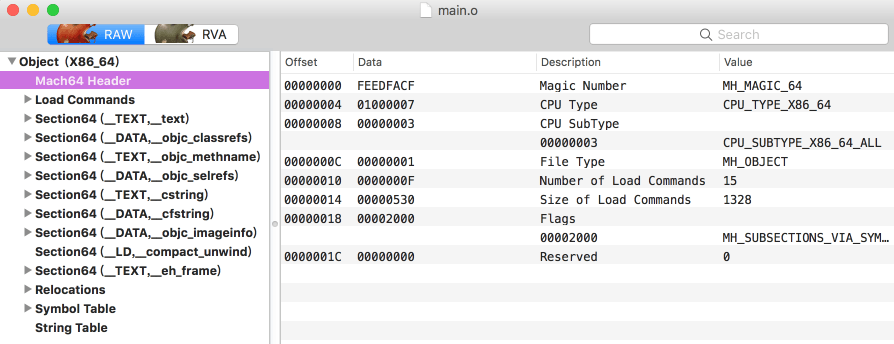
.macosx_version_min 10, 12
.globl _main
.p2align 4, 0x90
_main: ## @main
.cfi_startproc
## BB#0: ## %entry
pushq %rbp
Lcfi0:
.cfi_def_cfa_offset 16
Lcfi1:
.cfi_offset %rbp, -16
movq %rsp, %rbp
Lcfi2:
.cfi_def_cfa_register %rbp
subq $48, %rsp
movl $0, -4(%rbp)
callq _objc_autoreleasePoolPush
movl $10, -8(%rbp)
movl $8, -12(%rbp)
movq L_OBJC_CLASSLIST_REFERENCES_$_(%rip), %rcx
movq L_OBJC_SELECTOR_REFERENCES_(%rip), %rsi
movq %rcx, %rdi
movq %rax, -40(%rbp) ## 8-byte Spill
callq _objc_msgSend
leaq L_.str(%rip), %rdx
movq L_OBJC_SELECTOR_REFERENCES_.2(%rip), %rsi
movq %rax, %rdi
callq _objc_msgSend
leaq L__unnamed_cfstring_(%rip), %rcx
xorl %r8d, %r8d
movq %rax, -24(%rbp)
movl -8(%rbp), %r9d
movl -12(%rbp), %r10d
subl %r10d, %r8d
subl %r8d, %r9d
movl %r9d, -28(%rbp)
movq -24(%rbp), %rsi
movl -28(%rbp), %edx
movq %rcx, %rdi
movb $0, %al
callq _NSLog
xorl %edx, %edx
movl %edx, %esi
leaq -24(%rbp), %rcx
movq %rcx, %rdi
callq _objc_storeStrong
movq -40(%rbp), %rdi ## 8-byte Reload
callq _objc_autoreleasePoolPop
xorl %eax, %eax
addq $48, %rsp
popq %rbp
retq
.cfi_endproc

.section __DATA,__objc_classrefs,regular,no_dead_strip
.p2align 3 ## @"OBJC_CLASSLIST_REFERENCES_$_"
L_OBJC_CLASSLIST_REFERENCES_$_:
.quad _OBJC_CLASS_$_NSString

.section __TEXT,__objc_methname,cstring_literals
L_OBJC_METH_VAR_NAME_: ## @OBJC_METH_VAR_NAME_
.asciz "alloc"

.section __DATA,__objc_selrefs,literal_pointers,no_dead_strip
.p2align 3 ## @OBJC_SELECTOR_REFERENCES_
L_OBJC_SELECTOR_REFERENCES_:
.quad L_OBJC_METH_VAR_NAME_

.section __TEXT,__cstring,cstring_literals
L_.str: ## @.str
.asciz "AloneMonkey"

.section __TEXT,__objc_methname,cstring_literals
L_OBJC_METH_VAR_NAME_.1: ## @OBJC_METH_VAR_NAME_.1
.asciz "initWithUTF8String:"

.section __DATA,__objc_selrefs,literal_pointers,no_dead_strip
.p2align 3 ## @OBJC_SELECTOR_REFERENCES_.2
L_OBJC_SELECTOR_REFERENCES_.2:
.quad L_OBJC_METH_VAR_NAME_.1

.section __TEXT,__cstring,cstring_literals
L_.str.3: ## @.str.3
.asciz "Hello, %@, Age: %d"

.section __DATA,__cfstring
.p2align 3 ## @_unnamed_cfstring_
L__unnamed_cfstring_:
.quad ___CFConstantStringClassReference
.long 1992 ## 0x7c8
.space 4
.quad L_.str.3
.quad 18 ## 0x12

.section __DATA,__objc_imageinfo,regular,no_dead_strip
L_OBJC_IMAGE_INFO:
.long 0
.long 64


.subsections_via_symbols

3.7 生成目标文件

1
clang -fmodules -c main.m -o main.o

image

3.8 生成可执行文件

1
2
clang main.o -o main
./main
1
2016-12-20 15:25:42.299 main[8941:327306] Hello, AloneMonkey, Age: 18

3.9 整体流程

image

四、可以用Clang做什么?

4.1 libclang进行语法分析

可以使用libclang里面提供的方法对源文件进行语法分析,分析它的语法树,遍历语法树上面的每一个节点。可以用于检查拼写错误,或者做字符串加密。

来看一段代码的使用:

1
2
3
4
5
6
7
8
9
10
11
12
13
14
15
16
17
18
19
20
21
22
23
24
25
26
27
28
29
30
31
32
33
34
void *hand = dlopen("/Applications/Xcode.app/Contents/Developer/Toolchains/XcodeDefault.xctoolchain/usr/lib/libclang.dylib",RTLD_LAZY);

//初始化函数指针
initlibfunclist(hand);

CXIndex cxindex = myclang_createIndex(1, 1);

const char *filename = "/path/to/filename";

int index = 0;

const char ** new_command = malloc(10240);

NSMutableString *mus = [NSMutableString stringWithString:@"/Applications/Xcode.app/Contents/Developer/Toolchains/XcodeDefault.xctoolchain/usr/bin/clang -x objective-c -arch armv7 -isysroot /Applications/Xcode.app/Contents/Developer/Platforms/iPhoneOS.platform/Developer/SDKs/iPhoneOS.sdk"];

NSArray *arr = [mus componentsSeparatedByString:@" "];

for (NSString *tmp in arr) {
new_command[index++] = [tmp UTF8String];
}

nameArr = [[NSMutableArray alloc] initWithCapacity:10];

TU = myclang_parseTranslationUnit(cxindex, filename, new_command, index, NULL, 0, myclang_defaultEditingTranslationUnitOptions());

CXCursor rootCursor = myclang_getTranslationUnitCursor(TU);

myclang_visitChildren(rootCursor, printVisitor, NULL);

myclang_disposeTranslationUnit(TU);
myclang_disposeIndex(cxindex);
free(new_command);

dlclose(hand);

然后我们就可以在printVisitor这个函数里面去遍历输入文件的语法树了。

1
2
3
4
5
6
7
8
9
10
11
12
13
14
15
16
17
18
19
20
21
22
23
24
25
26
27
28
29
30
31
32
33
34
35
36
37
38
39
40
41
42
43
44
45
46
47
48
49
50
51
52
53
54
55
56
57
58
59
60
61
62
63
64
65
66
67
68
69
70
71
72
73
74
75
76
77
78
79
80
81
82
83
84
85
86
87
88
89
90
91
92
2016-12-20 16:25:44.006588 ParseClangLib[9525:368452] showString
int main(){
@autoreleasepool {
int numberOne = TEN;
int numberTwo = 8;
NSString* name = [[NSString alloc] initWithUTF8String:"AloneMonkey"];
int age = numberOne + numberTwo;
NSLog(@"Hello, %@, Age: %d", name, age);
}
return 0;
}
2016-12-20 16:25:44.007101 ParseClangLib[9525:368452] disname is main()
2016-12-20 16:25:44.007142 ParseClangLib[9525:368452] ccurkind is =>FunctionDecl
2016-12-20 16:25:44.007180 ParseClangLib[9525:368452] 继续遍历孩子节点main()
2016-12-20 16:25:44.007236 ParseClangLib[9525:368452] showString
{
@autoreleasepool {
int numberOne = TEN;
int numberTwo = 8;
NSString* name = [[NSString alloc] initWithUTF8String:"AloneMonkey"];
int age = numberOne + numberTwo;
NSLog(@"Hello, %@, Age: %d", name, age);
}
return 0;
}
2016-12-20 16:25:44.007253 ParseClangLib[9525:368452] disname is
2016-12-20 16:25:44.007263 ParseClangLib[9525:368452] ccurkind is =>CompoundStmt
2016-12-20 16:25:44.007274 ParseClangLib[9525:368452] 继续遍历孩子节点
2016-12-20 16:25:44.007309 ParseClangLib[9525:368452] showString
@autoreleasepool {
int numberOne = TEN;
int numberTwo = 8;
NSString* name = [[NSString alloc] initWithUTF8String:"AloneMonkey"];
int age = numberOne + numberTwo;
NSLog(@"Hello, %@, Age: %d", name, age);
}
2016-12-20 16:25:44.007424 ParseClangLib[9525:368452] disname is
2016-12-20 16:25:44.007442 ParseClangLib[9525:368452] ccurkind is =>ObjCAutoreleasePoolStmt
2016-12-20 16:25:44.007455 ParseClangLib[9525:368452] 继续遍历孩子节点
2016-12-20 16:25:44.007488 ParseClangLib[9525:368452] showString
{
int numberOne = TEN;
int numberTwo = 8;
NSString* name = [[NSString alloc] initWithUTF8String:"AloneMonkey"];
int age = numberOne + numberTwo;
NSLog(@"Hello, %@, Age: %d", name, age);
}
2016-12-20 16:25:44.007504 ParseClangLib[9525:368452] disname is
2016-12-20 16:25:44.007514 ParseClangLib[9525:368452] ccurkind is =>CompoundStmt
2016-12-20 16:25:44.007525 ParseClangLib[9525:368452] 继续遍历孩子节点
2016-12-20 16:25:44.007553 ParseClangLib[9525:368452] showString
int numberOne = TEN;
2016-12-20 16:25:44.007565 ParseClangLib[9525:368452] disname is
2016-12-20 16:25:44.007574 ParseClangLib[9525:368452] ccurkind is =>DeclStmt
2016-12-20 16:25:44.013133 ParseClangLib[9525:368452] 继续遍历孩子节点
2016-12-20 16:25:44.013206 ParseClangLib[9525:368452] showString
int numberOne = TEN
.......
2016-12-20 16:25:44.015848 ParseClangLib[9525:368452] ccurkind is =>ObjCStringLiteral
2016-12-20 16:25:44.015858 ParseClangLib[9525:368452] OC 字符串
2016-12-20 16:25:44.015876 ParseClangLib[9525:368452] showString
@"Hello, %@, Age: %d"
2016-12-20 16:25:44.015932 ParseClangLib[9525:368452] showString
name
2016-12-20 16:25:44.015973 ParseClangLib[9525:368452] disname is name
2016-12-20 16:25:44.015997 ParseClangLib[9525:368452] ccurkind is =>UnexposedExpr
2016-12-20 16:25:44.016013 ParseClangLib[9525:368452] 继续遍历孩子节点name
2016-12-20 16:25:44.016039 ParseClangLib[9525:368452] showString
name
2016-12-20 16:25:44.016051 ParseClangLib[9525:368452] disname is name
2016-12-20 16:25:44.016060 ParseClangLib[9525:368452] ccurkind is =>DeclRefExpr
2016-12-20 16:25:44.016071 ParseClangLib[9525:368452] 继续遍历孩子节点
2016-12-20 16:25:44.016137 ParseClangLib[9525:368452] showString
age
2016-12-20 16:25:44.016160 ParseClangLib[9525:368452] disname is age
2016-12-20 16:25:44.016170 ParseClangLib[9525:368452] ccurkind is =>UnexposedExpr
2016-12-20 16:25:44.016183 ParseClangLib[9525:368452] 继续遍历孩子节点
2016-12-20 16:25:44.016213 ParseClangLib[9525:368452] showString
age
2016-12-20 16:25:44.016256 ParseClangLib[9525:368452] disname is age
2016-12-20 16:25:44.016279 ParseClangLib[9525:368452] ccurkind is =>DeclRefExpr
2016-12-20 16:25:44.016293 ParseClangLib[9525:368452] 继续遍历孩子节点age
2016-12-20 16:25:44.016318 ParseClangLib[9525:368452] showString
return 0
2016-12-20 16:25:44.016330 ParseClangLib[9525:368452] disname is
2016-12-20 16:25:44.016339 ParseClangLib[9525:368452] ccurkind is =>ReturnStmt
2016-12-20 16:25:44.016350 ParseClangLib[9525:368452] 继续遍历孩子节点
2016-12-20 16:25:44.016369 ParseClangLib[9525:368452] showString
0
2016-12-20 16:25:44.016408 ParseClangLib[9525:368452] disname is
2016-12-20 16:25:44.016445 ParseClangLib[9525:368452] ccurkind is =>IntegerLiteral
2016-12-20 16:25:44.016461 ParseClangLib[9525:368452] 继续遍历孩子节点

我们也通过通过python去调用用clang:

1
pip install clang
1
2
3
4
5
6
7
8
9
10
11
12
13
14
15
16
17
18
19
20
21
22
23
24
25
26
#!/usr/bin/python
# vim: set fileencoding=utf-8

import clang.cindex
import asciitree
import sys

def node_children(node):
return (c for c in node.get_children() if c.location.file == sys.argv[1])

def print_node(node):
text = node.spelling or node.displayname
kind = str(node.kind)[str(node.kind).index('.')+1:]
return '{} {}'.format(kind, text)

if len(sys.argv) != 2:
print("Usage: dump_ast.py [header file name]")
sys.exit()

clang.cindex.Config.set_library_file('/Applications/Xcode.app/Contents/Developer/Toolchains/XcodeDefault.xctoolchain/usr/lib/libclang.dylib')
index = clang.cindex.Index.create()
translation_unit = index.parse(sys.argv[1], ['-x', 'objective-c'])

print asciitree.draw_tree(translation_unit.cursor,
lambda n: list(n.get_children()),
lambda n: "%s (%s)" % (n.spelling or n.displayname, str(n.kind).split(".")[1]))
1
2
3
4
5
6
7
8
9
10
11
12
13
14
15
16
17
18
19
20
21
22
23
24
25
26
27
28
29
30
31
32
33
34
35
36
37
38
39
.......
+--main (FUNCTION_DECL)
+-- (COMPOUND_STMT)
+-- (OBJC_AUTORELEASE_POOL_STMT)
| +-- (COMPOUND_STMT)
| +-- (DECL_STMT)
| | +--numberOne (VAR_DECL)
| | +-- (INTEGER_LITERAL)
| +-- (DECL_STMT)
| | +--numberTwo (VAR_DECL)
| | +-- (INTEGER_LITERAL)
| +-- (DECL_STMT)
| | +--name (VAR_DECL)
| | +--NSString (OBJC_CLASS_REF)
| | +--initWithUTF8String: (OBJC_MESSAGE_EXPR)
| | +--alloc (OBJC_MESSAGE_EXPR)
| | | +--NSString (OBJC_CLASS_REF)
| | +-- (UNEXPOSED_EXPR)
| | +-- (UNEXPOSED_EXPR)
| | +--"AloneMonkey" (STRING_LITERAL)
| +-- (DECL_STMT)
| | +--age (VAR_DECL)
| | +-- (BINARY_OPERATOR)
| | +--numberOne (UNEXPOSED_EXPR)
| | | +--numberOne (DECL_REF_EXPR)
| | +--numberTwo (UNEXPOSED_EXPR)
| | +--numberTwo (DECL_REF_EXPR)
| +--NSLog (CALL_EXPR)
| +--NSLog (UNEXPOSED_EXPR)
| | +--NSLog (DECL_REF_EXPR)
| +-- (UNEXPOSED_EXPR)
| | +--"Hello, %@, Age: %d" (OBJC_STRING_LITERAL)
| | +--"Hello, %@, Age: %d" (STRING_LITERAL)
| +--name (UNEXPOSED_EXPR)
| | +--name (DECL_REF_EXPR)
| +--age (UNEXPOSED_EXPR)
| +--age (DECL_REF_EXPR)
+-- (RETURN_STMT)
+-- (INTEGER_LITERAL)

那么基于语法树的分析,我们可以针对字符串做加密:

从左上角的明文字符串,处理成右下角的介个样子~

4.2 LibTooling

对语法树有完全的控制权,可以作为一个单独的命令使用,如:clang-format

1
clang-format main.m

我们也可以自己写一个这样的工具去遍历、访问、甚至修改语法树。 目录:llvm/tools/clang/tools

1
2
3
4
5
6
7
8
9
10
11
12
13
14
15
16
17
18
19
20
21
22
23
24
25
26
27
28
29
30
31
32
33
34
35
36
37
38
39
40
41
42
43
44
45
46
47
48
49
50
51
52
53
54
55
56
57
58
59
60
61
62
63
64
65
66
67
68
69
70
71
72
73
74
75
76
77
78
79
80
81
82
83
84
85
86
87
88
89
90
91
92
93
94
95
96
97
98
99
100
#include "clang/Driver/Options.h"
#include "clang/AST/AST.h"
#include "clang/AST/ASTContext.h"
#include "clang/AST/ASTConsumer.h"
#include "clang/AST/RecursiveASTVisitor.h"
#include "clang/Frontend/ASTConsumers.h"
#include "clang/Frontend/FrontendActions.h"
#include "clang/Frontend/CompilerInstance.h"
#include "clang/Tooling/CommonOptionsParser.h"
#include "clang/Tooling/Tooling.h"
#include "clang/Rewrite/Core/Rewriter.h"

using namespace std;
using namespace clang;
using namespace clang::driver;
using namespace clang::tooling;
using namespace llvm;

Rewriter rewriter;
int numFunctions = 0;

static llvm::cl::OptionCategory StatSampleCategory("Stat Sample");

class ExampleVisitor : public RecursiveASTVisitor<ExampleVisitor> {
private:
ASTContext *astContext; // used for getting additional AST info

public:
explicit ExampleVisitor(CompilerInstance *CI)
: astContext(&(CI->getASTContext())) // initialize private members
{
rewriter.setSourceMgr(astContext->getSourceManager(), astContext->getLangOpts());
}

virtual bool VisitFunctionDecl(FunctionDecl *func) {
numFunctions++;
string funcName = func->getNameInfo().getName().getAsString();
if (funcName == "do_math") {
rewriter.ReplaceText(func->getLocation(), funcName.length(), "add5");
errs() << "** Rewrote function def: " << funcName << "\n";
}
return true;
}

virtual bool VisitStmt(Stmt *st) {
if (ReturnStmt *ret = dyn_cast<ReturnStmt>(st)) {
rewriter.ReplaceText(ret->getRetValue()->getLocStart(), 6, "val");
errs() << "** Rewrote ReturnStmt\n";
}
if (CallExpr *call = dyn_cast<CallExpr>(st)) {
rewriter.ReplaceText(call->getLocStart(), 7, "add5");
errs() << "** Rewrote function call\n";
}
return true;
}
};


class ExampleASTConsumer : public ASTConsumer {
private:
ExampleVisitor *visitor; // doesn't have to be private

public:
// override the constructor in order to pass CI
explicit ExampleASTConsumer(CompilerInstance *CI)
: visitor(new ExampleVisitor(CI)) // initialize the visitor
{ }

// override this to call our ExampleVisitor on the entire source file
virtual void HandleTranslationUnit(ASTContext &Context) {
visitor->TraverseDecl(Context.getTranslationUnitDecl());
}
};


class ExampleFrontendAction : public ASTFrontendAction {
public:
virtual std::unique_ptr<ASTConsumer> CreateASTConsumer(CompilerInstance &CI, StringRef file) {
return llvm::make_unique<ExampleASTConsumer>(&CI); // pass CI pointer to ASTConsumer
}
};


int main(int argc, const char **argv) {
// parse the command-line args passed to your code
CommonOptionsParser op(argc, argv, StatSampleCategory);
// create a new Clang Tool instance (a LibTooling environment)
ClangTool Tool(op.getCompilations(), op.getSourcePathList());

// run the Clang Tool, creating a new FrontendAction (explained below)
int result = Tool.run(newFrontendActionFactory<ExampleFrontendAction>().get());

errs() << "\nFound " << numFunctions << " functions.\n\n";
// print out the rewritten source code ("rewriter" is a global var.)
rewriter.getEditBuffer(rewriter.getSourceMgr().getMainFileID()).write(errs());
return result;
}

上面的代码通过遍历语法树,去修改里面的方法名和返回变量名:

1
2
3
4
5
6
7
8
9
10
11
12
13
14
15
16
17
18
19
20
21
22
23
24
25
26
27
before:
void do_math(int *x) {
*x += 5;
}

int main(void) {
int result = -1, val = 4;
do_math(&val);
return result;
}

after:
** Rewrote function def: do_math
** Rewrote function call
** Rewrote ReturnStmt

Found 2 functions.

void add5(int *x) {
*x += 5;
}

int main(void) {
int result = -1, val = 4;
add5(&val);
return val;
}

那么,我们看到LibTooling对代码的语法树有完全的控制,那么我们可以基于它去检查命名的规范,甚至做一个代码的转换,比如实现OC转Swift。

4.3 ClangPlugin

对语法树有完全的控制权,作为插件注入到编译流程中,可以影响build和决定编译过程。目录:llvm/tools/clang/examples

1
2
3
4
5
6
7
8
9
10
11
12
13
14
15
16
17
18
19
20
21
22
23
24
25
26
27
28
29
30
31
32
33
34
35
36
37
38
39
40
41
42
43
44
45
46
47
48
49
50
51
52
53
54
55
56
57
58
59
60
61
62
63
64
65
66
67
68
69
70
71
72
73
74
75
76
77
78
79
80
81
82
83
84
85
86
87
88
#include "clang/Driver/Options.h"
#include "clang/AST/AST.h"
#include "clang/AST/ASTContext.h"
#include "clang/AST/ASTConsumer.h"
#include "clang/AST/RecursiveASTVisitor.h"
#include "clang/Frontend/ASTConsumers.h"
#include "clang/Frontend/FrontendActions.h"
#include "clang/Frontend/CompilerInstance.h"
#include "clang/Frontend/FrontendPluginRegistry.h"
#include "clang/Rewrite/Core/Rewriter.h"

using namespace std;
using namespace clang;
using namespace llvm;

Rewriter rewriter;
int numFunctions = 0;


class ExampleVisitor : public RecursiveASTVisitor<ExampleVisitor> {
private:
ASTContext *astContext; // used for getting additional AST info

public:
explicit ExampleVisitor(CompilerInstance *CI)
: astContext(&(CI->getASTContext())) // initialize private members
{
rewriter.setSourceMgr(astContext->getSourceManager(), astContext->getLangOpts());
}

virtual bool VisitFunctionDecl(FunctionDecl *func) {
numFunctions++;
string funcName = func->getNameInfo().getName().getAsString();
if (funcName == "do_math") {
rewriter.ReplaceText(func->getLocation(), funcName.length(), "add5");
errs() << "** Rewrote function def: " << funcName << "\n";
}
return true;
}

virtual bool VisitStmt(Stmt *st) {
if (ReturnStmt *ret = dyn_cast<ReturnStmt>(st)) {
rewriter.ReplaceText(ret->getRetValue()->getLocStart(), 6, "val");
errs() << "** Rewrote ReturnStmt\n";
}
if (CallExpr *call = dyn_cast<CallExpr>(st)) {
rewriter.ReplaceText(call->getLocStart(), 7, "add5");
errs() << "** Rewrote function call\n";
}
return true;
}
};


class ExampleASTConsumer : public ASTConsumer {
private:
ExampleVisitor *visitor; // doesn't have to be private

public:
// override the constructor in order to pass CI
explicit ExampleASTConsumer(CompilerInstance *CI):
visitor(new ExampleVisitor(CI)) { } // initialize the visitor

// override this to call our ExampleVisitor on the entire source file
virtual void HandleTranslationUnit(ASTContext &Context) {
/* we can use ASTContext to get the TranslationUnitDecl, which is
a single Decl that collectively represents the entire source file */
visitor->TraverseDecl(Context.getTranslationUnitDecl());
}
};

class PluginExampleAction : public PluginASTAction {
protected:
// this gets called by Clang when it invokes our Plugin
// Note that unique pointer is used here.
std::unique_ptr<ASTConsumer> CreateASTConsumer(CompilerInstance &CI, StringRef file) {
return llvm::make_unique<ExampleASTConsumer>(&CI);
}

// implement this function if you want to parse custom cmd-line args
bool ParseArgs(const CompilerInstance &CI, const vector<string> &args) {
return true;
}
};


static FrontendPluginRegistry::Add<PluginExampleAction> X("-example-plugin", "simple Plugin example");
1
2
3
4
5
clang -Xclang -load -Xclang ../build/lib/PluginExample.dylib -Xclang -plugin -Xclang -example-plugin -c testPlugin.c

** Rewrote function def: do_math
** Rewrote function call
** Rewrote ReturnStmt

我们可以基于ClangPlugin做些什么事情呢?我们可以用来定义一些编码规范,比如代码风格检查,命名检查等等。下面是我写的判断类名前两个字母是不是大写的例子,如果不是报错。(当然这只是一个例子而已。。。)

image

五、动手写Pass

5.1 一个简单的Pass

前面我们说到,Pass就是LLVM系统转化和优化的工作的一个节点,当然我们也可以写一个这样的节点去做一些自己的优化工作或者其它的操作。下面我们来看一下一个简单Pass的编写流程:

1.创建头文件

1
2
3
4
cd llvm/include/llvm/Transforms/
mkdir Obfuscation
cd Obfuscation
touch SimplePass.h

写入内容:

1
2
3
4
5
6
7
8
9
10
11
12
13
14
#include "llvm/IR/Function.h"
#include "llvm/Pass.h"
#include "llvm/Support/raw_ostream.h"
#include "llvm/IR/Intrinsics.h"
#include "llvm/IR/Instructions.h"
#include "llvm/IR/LegacyPassManager.h"
#include "llvm/Transforms/IPO/PassManagerBuilder.h"

// Namespace
using namespace std;

namespace llvm {
Pass *createSimplePass(bool flag);
}

2.创建源文件

1
2
3
4
5
6
7
cd llvm/lib/Transforms/
mkdir Obfuscation
cd Obfuscation

touch CMakeLists.txt
touch LLVMBuild.txt
touch SimplePass.cpp

CMakeLists.txt:

1
2
3
4
5
6
add_llvm_loadable_module(LLVMObfuscation
SimplePass.cpp

)

add_dependencies(LLVMObfuscation intrinsics_gen)

LLVMBuild.txt:

1
2
3
4
5
[component_0]
type = Library
name = Obfuscation
parent = Transforms
library_name = Obfuscation

SimplePass.cpp:

1
2
3
4
5
6
7
8
9
10
11
12
13
14
15
16
17
18
19
20
21
22
23
24
25
26
27
28
29
30
31
32
33
34
35
36
37
38
39
40
41
42
43
44
45
46
47
48
49
50
51
52
53
54
55
56
57
58
#include "llvm/Transforms/Obfuscation/SimplePass.h"

using namespace llvm;

namespace {
struct SimplePass : public FunctionPass {
static char ID; // Pass identification, replacement for typeid
bool flag;

SimplePass() : FunctionPass(ID) {}
SimplePass(bool flag) : FunctionPass(ID) {
this->flag = flag;
}

bool runOnFunction(Function &F) override {
if(this->flag){
Function *tmp = &F;
// 遍历函数中的所有基本块
for (Function::iterator bb = tmp->begin(); bb != tmp->end(); ++bb) {
// 遍历基本块中的每条指令
for (BasicBlock::iterator inst = bb->begin(); inst != bb->end(); ++inst) {
// 是否是add指令
if (inst->isBinaryOp()) {
if (inst->getOpcode() == Instruction::Add) {
ob_add(cast<BinaryOperator>(inst));
}
}
}
}
}
return false;
}

// a+b === a-(-b)
void ob_add(BinaryOperator *bo) {
BinaryOperator *op = NULL;

if (bo->getOpcode() == Instruction::Add) {
// 生成 (-b)
op = BinaryOperator::CreateNeg(bo->getOperand(1), "", bo);
// 生成 a-(-b)
op = BinaryOperator::Create(Instruction::Sub, bo->getOperand(0), op, "", bo);

op->setHasNoSignedWrap(bo->hasNoSignedWrap());
op->setHasNoUnsignedWrap(bo->hasNoUnsignedWrap());
}

// 替换所有出现该指令的地方
bo->replaceAllUsesWith(op);
}
};
}

char SimplePass::ID = 0;

// 注册pass 命令行选项显示为simplepass
static RegisterPass<SimplePass> X("simplepass", "this is a Simple Pass");
Pass *llvm::createSimplePass() { return new SimplePass(); }

修改.../Transforms/LLVMBuild.txt, 加上刚刚写的模块Obfuscation

1
subdirectories = Coroutines IPO InstCombine Instrumentation Scalar Utils Vectorize ObjCARC Obfuscation

修改.../Transforms/CMakeLists.txt, 加上刚刚写的模块Obfuscation

1
add_subdirectory(Obfuscation)

编译生成:LLVMSimplePass.dylib

因为Pass是作用于中间代码,所以我们首先要生成一份中间代码:

1
clang -emit-llvm -c test.c -o test.bc

然后加载Pass优化:

1
../build/bin/opt -load ../build/lib/LLVMSimplePass.dylib -simplepass < test.bc > after_test.bc

对比中间代码:

1
2
llvm-dis test.bc -o test.ll
llvm-dis after_test.bc -o after_test.ll
1
2
3
4
5
6
7
8
9
10
11
12
13
14
15
16
17
18
19
test.ll
......
entry:
%retval = alloca i32, align 4
%a = alloca i32, align 4
%b = alloca i32, align 4
%c = alloca i32, align 4
store i32 0, i32* %retval, align 4
store i32 3, i32* %a, align 4
store i32 4, i32* %b, align 4
%0 = load i32, i32* %a, align 4
%1 = load i32, i32* %b, align 4
%add = add nsw i32 %0, %1
store i32 %add, i32* %c, align 4
%2 = load i32, i32* %c, align 4
%call = call i32 (i8*, ...) @printf(i8* getelementptr inbounds ([4 x i8], [4 x i8]* @.str, i32 0, i32 0), i32 %2)
ret i32 0
}
......
1
2
3
4
5
6
7
8
9
10
11
12
13
14
15
16
17
18
19
20
21
after_test.ll
......
entry:
%retval = alloca i32, align 4
%a = alloca i32, align 4
%b = alloca i32, align 4
%c = alloca i32, align 4
store i32 0, i32* %retval, align 4
store i32 3, i32* %a, align 4
store i32 4, i32* %b, align 4
%0 = load i32, i32* %a, align 4
%1 = load i32, i32* %b, align 4
%2 = sub i32 0, %1
%3 = sub nsw i32 %0, %2
%add = add nsw i32 %0, %1
store i32 %3, i32* %c, align 4
%4 = load i32, i32* %c, align 4
%call = call i32 (i8*, ...) @printf(i8* getelementptr inbounds ([4 x i8], [4 x i8]* @.str, i32 0, i32 0), i32 %4)
ret i32 0
}
......

这里写的Pass只是把a+b简单的替换成了a-(-b),只是一个演示,怎么去写自己的Pass,并且作用于代码。

5.2 将Pass加入PassManager管理

上面我们是单独去加载Pass动态库,这里我们将Pass加入PassManager,这样我们就可以直接通过clang的参数去加载我们的Pass了。

首先在llvm/lib/Transforms/IPO/PassManagerBuilder.cpp添加头文件。

1
#include "llvm/Transforms/Obfuscation/SimplePass.h"

然后添加如下语句:

1
2
static cl::opt<bool> SimplePass("simplepass", cl::init(false),
cl::desc("Enable simple pass"));

然后在populateModulePassManager这个函数中添加如下代码:

1
MPM.add(createSimplePass(SimplePass));

最后在IPO这个目录的LLVMBuild.txt中添加库的支持,否则在编译的时候会提示链接错误。具体内容如下:

1
required_libraries = Analysis Core InstCombine IRReader Linker Object ProfileData Scalar Support TransformUtils Vectorize Obfuscation

修改Pass的CMakeLists.txt为静态库形式:

1
2
3
4
5
add_llvm_library(LLVMObfuscation
SimplePass.cpp
)

add_dependencies(LLVMObfuscation intrinsics_gen)

最后再编译一次。

那么我们可以这么去调用:

1
../build/bin/clang -mllvm -simplepass test.c -o after_test

基于Pass,我们可以做什么? 我们可以编写自己的Pass去混淆代码,以增加他人反编译的难度。

我们可以把代码左上角的样子,变成右下角的样子,甚至更加复杂~

六、总结

上面说了那么说,来总结一下:

1.LLVM编译一个源文件的过程:

预处理 -> 词法分析 -> Token -> 语法分析 -> AST -> 代码生成 -> LLVM IR -> 优化 -> 生成汇编代码 -> Link -> 目标文件

2.基于LLVM,我们可以做什么?

  1. 做语法树分析,实现语言转换OC转Swift、JS or 其它语言,字符串加密。
  2. 编写ClangPlugin,命名规范,代码规范,扩展功能。
  3. 编写Pass,代码混淆优化。

这篇只是一个简单的入门介绍,个人还需要深入去学习LLVM,再给大家分享,如有问题,欢迎拍砖~

AloneMonkey wechat
欢迎您扫一扫上面的微信公众号,订阅我的博客!