RxSwift学习之旅 - UITableView操作

正常开发

在正常开发中要使用UITableView的话,需要设置dataSourcedelegate,然后实现对应的协议方法。

1
2
3
4
5
6
7
8
9
10
11
tableView.dataSource = self
tableView.delegate = self


func tableView(_ tableView: UITableView, numberOfRowsInSection section: Int) -> Int {

}

func tableView(_ tableView: UITableView, cellForRowAt indexPath: IndexPath) -> UITableViewCell {

}

简单的例子

来个简单的例子看看Rx中对UITableView是怎么处理的。

老套路,新建项目,引入pod,放个UITableViewUITableViewCell

然后初始化一些数据使用Rx绑定到UITableView

1
2
3
4
5
6
7
8
9
10
11
12
13
14
15
16
17
18
19
20
21
let items = Observable.just(
(0...20).map{ "\($0)" }
)

//使用数据初始化cell
items
.bindTo(tableview.rx.items(cellIdentifier: "Cell", cellType: UITableViewCell.self)){
(row, elememt, cell) in
cell.textLabel?.text = "\(elememt) @row \(row)"
}.disposed(by: disposeBag)

//cell的点击事件
tableview.rx
.modelSelected(String.self)
.subscribe(
onNext:{
value in
print("click \(value)")
}
)
.disposed(by: disposeBag)

通过简短的几行代码,就把通过设置dataSourcedelegate的事来做了。

例子官方都有,下面来看看它的原理是什么?

原理解析

1
2
3
4
5
items
.bindTo(tableview.rx.items(cellIdentifier: "Cell", cellType: UITableViewCell.self)){
(row, elememt, cell) in
cell.textLabel?.text = "\(elememt) @row \(row)"
}.disposed(by: disposeBag)

这段代码,简单来说,是在里面创建了一个dataSource的代理对象,然后代理对象的方法会使用传入的items以及cell设置。

1
2
3
4
5
6
7
override func _tableView(_ tableView: UITableView, numberOfRowsInSection section: Int) -> Int {
return itemModels?.count ?? 0
}

override func _tableView(_ tableView: UITableView, cellForRowAt indexPath: IndexPath) -> UITableViewCell {
return cellFactory(tableView, indexPath.item, itemModels![indexPath.row])
}

这里调用的itemModels就是传入的items, 调用的cellFactory就是传入的:

1
2
3
4
5
6
{ (tv, i, item) in
let indexPath = IndexPath(item: i, section: 0)
let cell = tv.dequeueReusableCell(withIdentifier: cellIdentifier, for: indexPath) as! Cell
configureCell(i, item, cell)
return cell
}

而这个configureCell就是最开始的:

1
2
3
4
{
(row, elememt, cell) in
cell.textLabel?.text = "\(elememt) @row \(row)"
}

modelSelected也是delegatetableView:didSelectRowAtIndexPath:包装了下:

1
2
3
4
5
6
7
8
public var itemSelected: ControlEvent<IndexPath> {
let source = self.delegate.methodInvoked(#selector(UITableViewDelegate.tableView(_:didSelectRowAt:)))
.map { a in
return try castOrThrow(IndexPath.self, a[1])
}

return ControlEvent(events: source)
}

大家还是自己看看源码理一下吧~~

RxDataSource

如果要显示多个Sectiontableview的话,可以借助RxDataSource帮我们完成。

新建一个项目,pod导入

1
2
3
4
5
6
7
8
9
use_frameworks!

target 'RxSwiftTableViewSection' do

pod 'RxSwift'
pod 'RxCocoa'
pod 'RxDataSources'

end

这里要额外引入RxDataSources

首先创建一个dataSource对象:

1
let dataSource = RxTableViewSectionedReloadDataSource<SectionModel<String, Double>>()

然后创建自定义的数据:

1
2
3
4
5
6
7
8
9
10
11
12
13
14
15
16
17
let items = Observable.just([
SectionModel(model: "First", items:[
1.0,
2.0,
3.0
]),
SectionModel(model: "Second", items:[
1.0,
2.0,
3.0
]),
SectionModel(model: "Third", items:[
1.0,
2.0,
3.0
])
])

配置cell:

1
2
3
4
5
6
dataSource.configureCell = {
(_, tv, indexPath, element) in
let cell = tv.dequeueReusableCell(withIdentifier: "Cell")!
cell.textLabel?.text = "\(element) @ row \(indexPath.row)"
return cell
}

设置sectiontitle:

1
2
3
dataSource.titleForHeaderInSection = { dataSource, sectionIndex in
return dataSource[sectionIndex].model
}

把数据绑定到dataSource:

1
2
3
items
.bindTo(tableview.rx.items(dataSource: dataSource))
.disposed(by: disposeBag)

点击事件:

1
2
3
4
5
6
7
8
9
tableview.rx
.itemSelected
.map { indexPath in
return (indexPath, dataSource[indexPath])
}
.subscribe(onNext: { indexPath, model in
print("Tapped `\(model)` @ \(indexPath)")
})
.disposed(by: disposeBag)

虽然RxDataSource内部有一个代理对象,但是我们仍然可以设置delegate

1
2
3
tableview.rx
.setDelegate(self)
.disposed(by: disposeBag)

然后实现delegate方法:

1
2
3
4
5
6
7
8
9
extension ViewController : UITableViewDelegate{
func tableView(_ tableView: UITableView, editingStyleForRowAt indexPath: IndexPath) -> UITableViewCellEditingStyle {
return .none
}

func tableView(_ tableView: UITableView, heightForHeaderInSection section: Int) -> CGFloat {
return 40
}
}

这里和上面不同的是,我们主动创建了一个dataSource传了进去。

Proxy

上面我们提到了代理对象,这个代理对象到底是什么?

我们来看看源码中的解释:

image

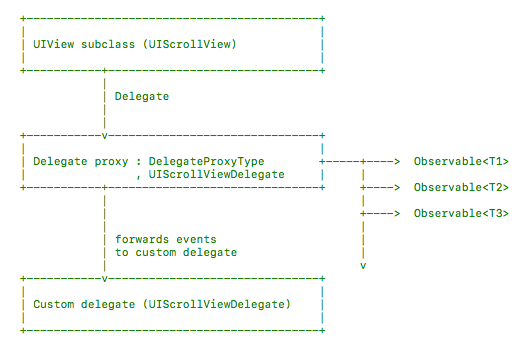
它就相当与一个中间拦截器,把原始的代码对象的方法转成一个个可被观察的序列发射出去,然后再转发给我们自定义的delegate。所以它既不影响我们自己设置的delegate,同时还可以以Rx的方式去处理这些事件。

本文的例子都是以为官方为例,后面会加入通过网络请求获取Model等操作。

RxSwiftTableView

AloneMonkey wechat
欢迎您扫一扫上面的微信公众号,订阅我的博客!